|
HTML HTML5 HTMLタグ スマートフォン |
CSS CSSプロパティ CSS・HTML便利ツール |
HTML色見本 配色組み合わせツール 特殊文字 |
JAVA Android |
PHP Smarty修飾子 EXCEL |
*このページは web-dou.com のアーカイブです。(2025年 サイト統合)
画面遷移
TOP > Androidアプリ開発日誌 >
画面遷移
画面遷移
 画面遷移の基本を解説します。
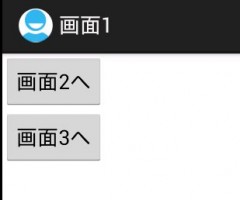
画面1、画面2、画面3 を用意し、それぞれの画面のボタンから別の画面へ遷移します。
ポイントは、ボタンをクリックした時に、Intent を作成し、startActivity関数で画面を起動します。
src/MainActivity.java (スタート時の画面のプログラム)
package jp.mediawing.android.test2;

import android.app.Activity;
import android.content.Context;
import android.os.Bundle;
import android.view.View;
import android.widget.Button;
import android.content.Intent;

public class MainActivity extends Activity {
	@Override
    public void onCreate(Bundle savedInstanceState) {
        super.onCreate(savedInstanceState);
        // res/layout/screen1.xml を初期画面に
        setContentView(R.layout.screen1);
        setTitle("画面1");

        Button btn2 = (Button) findViewById(R.id.btn2);
        Button btn3 = (Button) findViewById(R.id.btn3);

        btn2.setOnClickListener(new View.OnClickListener() {
            @Override
            public void onClick(View v) {
            	Intent intent = new Intent(MainActivity.this,
            		Screen2Activity.class );
            	startActivity(intent);
            }
        });

        btn3.setOnClickListener(new View.OnClickListener() {
            @Override
            public void onClick(View v) {
            	Intent intent = new Intent(MainActivity.this,
            		Screen3Activity.class );
            	startActivity(intent);
            }
        });
	}
}
src/Screen2Activity.java (画面2のプログラム) 新規Activityの作成方法はこちら
package jp.mediawing.android.test2;

import android.os.Bundle;
import android.app.Activity;
import android.content.Intent;
import android.view.View;
import android.widget.Button;

public class Screen2Activity extends Activity {
	@Override
	protected void onCreate(Bundle savedInstanceState) {
		super.onCreate(savedInstanceState);
		setContentView(R.layout.screen2);
        setTitle("画面2");

        Button btn4 = (Button) findViewById(R.id.btn4);
        Button btn5 = (Button) findViewById(R.id.btn5);

        btn4.setOnClickListener(new View.OnClickListener() {
            public void onClick(View v) {
            	Intent intent = new Intent(Screen2Activity.this,
            		MainActivity.class );
            	startActivity(intent);
                finish(); // アクティビティ終了
            }
        });

        btn5.setOnClickListener(new View.OnClickListener() {
            public void onClick(View v) {
            	Intent intent = new Intent(Screen2Activity.this,
            		Screen3Activity.class );
            	startActivity(intent);
                finish(); // アクティビティ終了
            }
        });
	}
}
src/Screen3Activity.java (画面3のプログラム) 新規Activityの作成方法はこちら
package jp.mediawing.android.test2;

import android.os.Bundle;
import android.app.Activity;
import android.content.Intent;
import android.view.View;
import android.widget.Button;

public class Screen3Activity extends Activity {
	@Override
	protected void onCreate(Bundle savedInstanceState) {
		super.onCreate(savedInstanceState);
		setContentView(R.layout.screen3);
        setTitle("画面3");

        Button btn6 = (Button) findViewById(R.id.btn6);
        Button btn7 = (Button) findViewById(R.id.btn7);

        btn6.setOnClickListener(new View.OnClickListener() {
            public void onClick(View v) {
            	Intent intent = new Intent(Screen3Activity.this,
            		MainActivity.class );
            	startActivity(intent);
                finish(); // アクティビティ終了
            }
        });

        btn7.setOnClickListener(new View.OnClickListener() {
            public void onClick(View v) {
            	Intent intent = new Intent(Screen3Activity.this,
            		Screen2Activity.class );
            	startActivity(intent);
                finish(); // アクティビティ終了
            }
        });
	}
}
res/layout/screen1.xml (スタート時の画面のレイアウトファイル)
<?xml version="1.0" encoding="utf-8"?>
<LinearLayout xmlns:android="http://schemas.android.com/apk/res/android"
    android:layout_width="match_parent"
    android:layout_height="match_parent"
    android:orientation="vertical" >

    <Button
        android:id="@+id/btn2"
        android:layout_width="wrap_content"
        android:layout_height="wrap_content"
        android:text="画面2へ" />

    <Button
        android:id="@+id/btn3"
        android:layout_width="wrap_content"
        android:layout_height="wrap_content"
        android:text="画面3へ" />

</LinearLayout>
res/layout/screen2.xml (画面2のレイアウトファイル)
<?xml version="1.0" encoding="utf-8"?>
<LinearLayout xmlns:android="http://schemas.android.com/apk/res/android"
    android:layout_width="match_parent"
    android:layout_height="match_parent"
    android:orientation="vertical" >

    <Button
        android:id="@+id/btn4"
        android:layout_width="wrap_content"
        android:layout_height="wrap_content"
        android:text="画面1へ" />

    <Button
        android:id="@+id/btn5"
        android:layout_width="wrap_content"
        android:layout_height="wrap_content"
        android:text="画面3へ" />

</LinearLayout>
res/layout/screen3.xml (画面3のレイアウトファイル)
<?xml version="1.0" encoding="utf-8"?>
<LinearLayout xmlns:android="http://schemas.android.com/apk/res/android"
    android:layout_width="match_parent"
    android:layout_height="match_parent"
    android:orientation="vertical" >

    <Button
        android:id="@+id/btn6"
        android:layout_width="wrap_content"
        android:layout_height="wrap_content"
        android:text="画面1へ" />

    <Button
        android:id="@+id/btn7"
        android:layout_width="wrap_content"
        android:layout_height="wrap_content"
        android:text="画面2へ" />

</LinearLayout>
